Approval Paths
Audience: System Administrators, Change Managers
When a Controlled Document is uploaded to the EQMS system, be it a completely new document or a new version of an existing one, it must pass through an approval process. This process is defined in the Change Manager module and is known as an Approval Path, and its elements are known as Actions.
This page will guide you through the process of creating and amending Approval Paths with and without modification enabled.
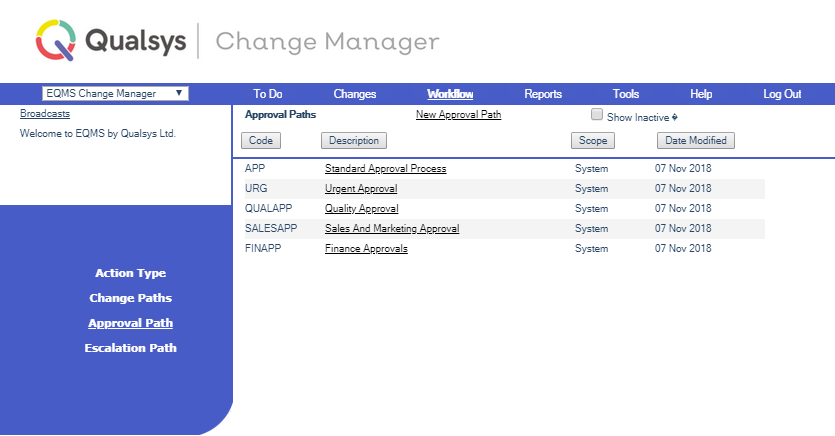
- Select EQMS Change Manager | Workflow | Approval Paths. You will be presented with a similar screen to this:
- Select New Approval Path, located above the Description column heading. The New Approval Path screen is displayed similar to this:
![]()
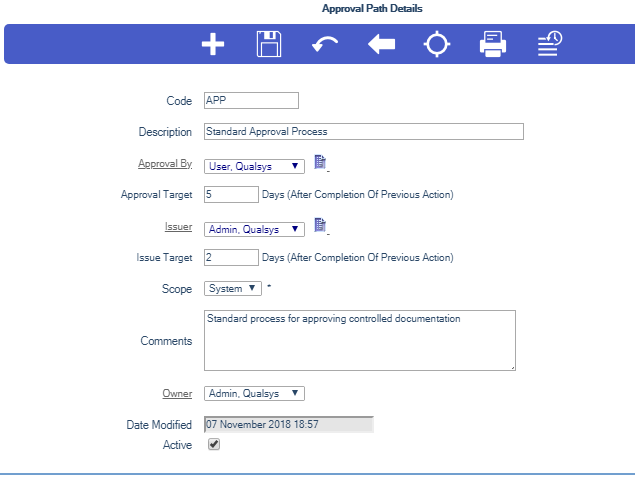
- Complete the required fields and select the Save icon.
- The Code and Description are mandatory and will be used in the dropdown box when the Document Manager wants to associate an Approval Path with a Controlled Document Type.
- The Issue and Approval Target days, which are mandatory, are used to calculate the Target Date for any generated RFC.
- The Scope denotes whether the Approval Path can be used System wide or is for the Private use of the Approval Path Owner.
- The Use Action Modification allows the modification of the Approval Path Action owners prior to issuing the first action. The Actions are owned by a User
- The Comments are for information.
- The Approval by and Issuer are mandatory and detail the people given the tasks of Approval and Issue in the Approval Path Actions.
- The Owner defaults to the person creating the Approval Path.
- The Escalation Path allows you to associate a predefined Escalation Path with the Approval Path.
- The Date Modified is maintained by the system.
- Once saved the Approval Path Details screen is displayed similar to this:
- Select the Actions icon. You will be presented with the Approval Path Actions screen similar to this:

- Select Add New Action To Sequence, located above the Action column heading. You will be presented with the New Approval Path Action screen similar to this:
![]()
Now you can add further Actions to the Approval Path one at a time.
- Select your additional Action from the Action Type dropdown box.
- The New Approval Path Action details are populated from the selected Action Type template.
- The Action By defaults to you so select an Actionee from the dropdown box or user selection list, supply the Days to Complete and select the Save icon. You will be presented with an overlaid dialogue screen similar to this:
- Select OK to sane the details or Cancel to reject. You will be presented with an overlaid dialogue screen similar to this:
- Select OK to continue. The Approval Path Action screen is displayed. Select the Back icon to return to the Approval Path Actions screen similar to this:

The following example shows details of Standard Approval Path with 3 additional Actions.
The first two Actions will be done in parallel (sequence 01). When completed, the Review and Approve or Abandon will be launched (sequence 02), and so on. You may alter the sequence by changing the sequence numbers with the + and - icons. This Approval Path is ready to associate with a Document Control Type, so that it can be applied to any Document on change of Version. The controlling RFC will have a target date 15 working days after its issue calculated from the cumulative target days of each of its Actions.
Important:
If the owner of Action number 98 – Approve Document and 99 – Issue Document is the same User then these Actions will be completed simultaneously.
- If the Approval Path has an associated Escalation Path the blue menu bar will also contain an Escalation button. Select this button and you will be presented with the Escalation Path Action List screen similar to this:

- Select Add New Escalation Step, located above the Escalations column heading. You will be presented with the Escalation Step Details screen similar to this:
![]()
- Complete the required fields and select the Save icon
- The Step Title and Days+/- are mandatory and will determine what message is sent and when. +days are after the Approval Target date and –days are prior to the Approval Target date.
- Escalate To is the user who will receive the message.
- The No of Reminders and Days Between Reminders determines if the escalation message is sent out more than once and how often.
- Step Locked prevents the Escalation Step message from being amended
Now you can add as many steps to the Escalation Path as you wish, one at a time. The new Escalation Path Steps will only apply to the Approval Path. The Escalation Path template will not be altered.
- Select EQMS Change Manager | Workflow | Approval Paths and select an Approval Path from the Approval Path List. The Approval Path Details screen is displayed similar to this:
- Modify the Approval Path record
- Select the Save icon. You will be presented with an overlaid dialogue screen similar to this:

- Select OK to save the changes or Cancel to reject. You will be presented with an overlaid dialogue screen similar to this:

- Select the Actions icon. You will be presented with the Approval Path Action List screen similar to this:
You may leave the Approval Path as it is, remove an Action by selecting the Delete (X) icon, add additional Actions to the Approval Path one at a time, or change the Actionee
- Select the Escalation Steps icon. You will be presented with the Escalation Steps screen similar to this:
You may leave the Escalation Path as it is, remove a Step by selecting the Delete (X) icon or you can add additional Steps to the Escalation Path one at a time.
Action Modification enables the ability to modify action details prior to the workflow being launched e.g. Change Actionee, Amend Details.
Note:
This feature must first be enabled in the module parameters
'Invite RFC Action Modification Pre-Launch'
- Select EQMS Change Manager | Workflow | Approval Paths. You will be presented with a similar screen to this:
- Select New Approval Path, located above the Description column heading. The New Approval Path screen is displayed similar to this:

- Select the Use Action Modification check box. The New Approval Path screen will refresh to reveal additional fields similar to this:

- Now tick the Can Change Actionee checkboxes to the right of the Approved By and Issuer fields. The New Approval Path screen will refresh to reveal additional fields similar to this:
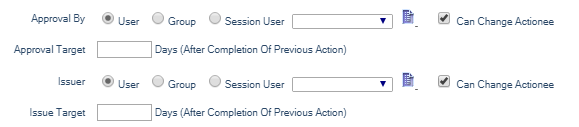
- Three new radio buttons are revealed. Approval and Issue by a specific User, by a member of a selected Group or by the Session User. The default selection for Approval and Issue is by User.
- Select the User radio button and populate the Approval By and Issuer fields from the Drop Down Box or User Selection List
- Select Save from the header bar.
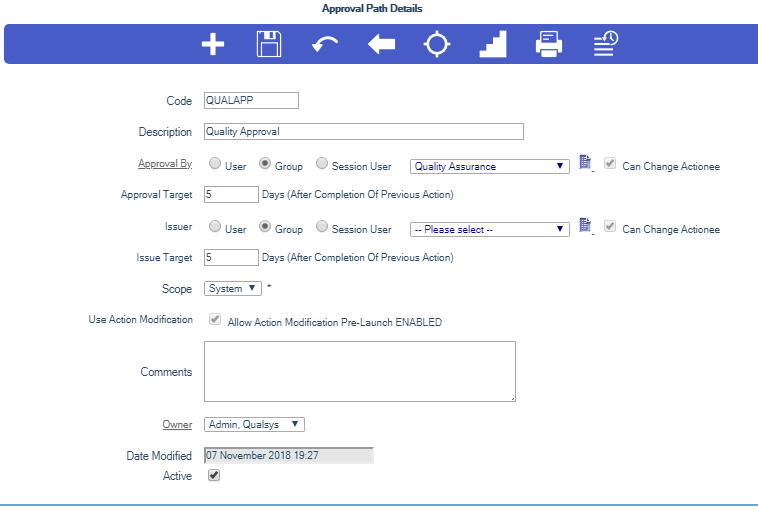
- The Approval Path Details screen will be displayed similar to this:

- Select the Group radio button and populate the Approval By and Issuer fields from the Drop Down Box or Group Selection List
- Select Save from the header bar.
- The Approval Path Details screen will be displayed similar to this:

- Select the Session User radio button and populate the Approval By and Issuer fields from the Drop Down Box or User Selection List
- Select Save from the header bar.
- The Approval Path Details screen will be displayed similar to this:

- Complete the required fields and select the Save icon.
- The Code and Description are mandatory and will be used in the dropdown box when the Document Manager wants to associate an Approval Path with a Controlled Document Type.
- The Issue and Approval Target days, which are mandatory, are used to calculate the Target Date for any generated RFC.
- The Scope denotes whether the Approval Path can be used System wide or is for the Private use of the Approval Path Owner.
- The Use Action Modification allows the modification of the Approval Path Action owners prior to issuing the first action.
- The Comments are for information.
- The Approval by and Issuer are mandatory and detail the people given the tasks of Approval and Issue in the Approval Path Actions.
- The Owner defaults to the person creating the Approval Path.
- The Escalation Path allows you to associate a predefined Escalation Path with the Approval Path.
You will be presented with an overlaid dialogue screen similar to this:
- Select OK to save the Approval Path or Cancel to reject.
- Select OK to continue.